Friday, July 27, 2012

Nomz for Ninja-Grandmom's Birthday - Seitan Hot "Wings" and Roasted Sweet Potato Salad

I selected this post to be featured on Vegan Blogs. Please visit the site and vote for my blog!


It's summertime, ninjas!  Time for cookouts with good friends, good brew, and of course....good ninja eats!  My ninja-grandmom celebrated her 90th birthday a couple of weeks ago and I made some rockin' good food for the occasion.  I absolutely love any excuse to make an obscenely large amount of awesomely delicious food - especially when I get to please a crowd of omnivores in the process.  So of course I showed up to grandmom's shindig with a ridiculous amount of vegan scrumptiousness (prompting a comment from my ninja-love Mike, "Isn't this party catered?"  Well yes....but I wouldn't be me if I didn't cart around stupid amounts of food to a gathering) to share.

So here's a special double-recipe post of what I made for my awesome grandmom's party.  The "wings" and potato salad both travel well, and were scarfed down by vegans and omnis alike.  Next time you hit a pot luck or cookout, bring one or both, but be warned - you probably won't have much in the way of leftovers!

Onto the recipes!


Seitan "Wings" and Roasted Sweet Potato Salad


Seitan "Wings" With Creamy Dipping Sauce

Please note: these take some advance prep as they need to chill overnight.  Plan accordingly!  They are also VERY hot; you can adjust the hot sauce/butter ratio as you see fit.  Double this recipe if making for a crowd - I made 2 lbs and they were nearly all eaten up by the end of the party even though there were only 2 other vegans in attendance.

Ingredients:

Wings 
2 lb seitan, torn into bite-sized chunks
3/4 cup flour
1/2 teaspoon cayenne pepper
1/2 teaspoon garlic powder
1/2 teaspoon salt
1 cup non-dairy butter
1 cup hot pepper sauce (I used a combo of Louisiana Hot Sauce and Frank's Red Hot)
2 Tablespoons tomato paste

First, you need to get your seitan as dry as humanly possible.  Whether you make your own seitan like I do (try the recipe in Veganomicon - amazing!) or buy it at the store, chances are when you start this recipe it's swimming in some sort of broth.  You need to get as much moisture out of the seitan as possible if you want it to get crispy.  Take the torn up chunks of seitan, and one at a time squeeze them between paper towels until they are relatively dry.  This will make a huge mess and use up about half a roll of paper towels.  Just decide to be okay with this before you start.  Once the seitan chunks are dried, mix together the flour, cayenne, garlic powder, and salt in a bowl.  Dunk the chunks in the flour mixture, making sure to tap the chunks on the side of the bowl in order to shake off the excess.  Place the seitan chunks in a lidded container lined with paper towels and put in the fridge to chill overnight.  If you can't wait that long, make sure they're in there for at least an hour.
Preheat your oven to 400 degrees F and line two baking sheets with aluminum foil.  Grease the foil lightly with cooking spray or olive oil.  Melt the non-dairy butter in the microwave or a small saucepan over low heat.  Mix in the hot sauce and tomato paste with a fork.  Remove the chilled seitan chunks from the fridge and dunk each one in the hot sauce mixture and place on a baking sheet.  Bake for 1 hour, turning once, or until the chunks are browned, but not burnt.  Serve either hot or room temp with dipping sauce.

Creamy Dipping Sauce
I didn't like bleu cheese even BEFORE I was vegan, so I'm really not sure how close this is.  Probably not very....but it was delicious on the wings.  It also makes a great dip for veggies and is yummy spread on veggie wraps, burgers, and sandwiches.
 
1 cup soft silken tofu
1/2 cup tahini
1 Tablespoon agave nectar
1 teaspoon apple cider vinegar
1/4 cup nutritional yeast
1/4 teaspoon vegan worcestershire sauce (sub soy sauce if you can't find any)
1 clove minced garlic
3 Tablespoons canola or other light oil
1 Tablespoon lemon juice

Put everything in a blender and blend until smooth.  Chill until ready to use.  That's it!

Tips and Tricks:

1. Make your own seitan.  Seriously....do it.  Store-bought seitan is SO overpriced and definitely not as tasty.  I use the recipe in the amazing Veganomicon.  If you don't have this cookbook, you need to go out and buy it...right now....I'll wait............ok then.  Isa's recipe in Veganomicon only makes 1 lb so you'll have to double it, or if you're like me and don't have a pot big enough to make 2 lbs of seitan at the same time, you'll have to make two batches.  Seitan is pretty easy though, and yeah - it needs an hour to cook, but I figure that's how long it would take me to drive to the store and buy some anyway.

2. All ovens are different, and these little wingies can go from deliciously crispy to burned and horrible in a very short time.  Check them every 20 minutes or so.

3. You need the silken, shelf-stable boxed tofu for this recipe.  You can usually find it in the aisle with the Asian food.  In a pinch, use the water-packed, refrigerated kind, but the texture might not be as smooth.  Measuring tofu is a pain, but just kind of smoosh it into the measuring cup and do your best; it doesn't have to be 100% precise.

4. Vegan worcestershire sauce can be challenging to find.  Annie's Naturals makes a good one that I always keep on hand for when I need a bloody mary fix.  I've also found some cheapie store-brand worcestershire on occasion that does not contain anchovies.  If you are stuck, just substitute soy sauce and it won't be too much different.


And now, onto the next recipe!  This potato salad got RAVE reviews from everyone at the party.  The spiciness of the onion, pepper, and Mexican-inspired spices contrasts beautifully with the cooling dressing and sweetness of the roasted veggies.  It's freakin' delicious.  Make some.  Make some now.

Roasted Sweet Potato Salad
If you can't find vegan mayo or don't want to use it, just substitute more soft silken tofu.  You might have to adjust the seasonings slightly if you do this, so make sure you taste, taste, taste!

Ingredients:

2 lbs sweet potatoes, peeled and cut into 1" chunks
1/4 cup olive oil 
1/2 teaspoon cayenne pepper
2 teaspoons cumin, divided
1 teaspoon paprika
2 teaspoons salt, divided
2 ears corn, un-husked
1/2 red onion, diced
1 serrano chili, minced 
1 clove garlic, minced
1/2 cup soft silken tofu
1/4 cup vegan mayo (I used Vegenaise)
3 Tablespoons canola or other light oil
2 teaspoons apple cider vinegar
1/2 teaspoon lemon juice
1/2 teaspoon spicy brown mustard
1/2 teaspoon chili powder
1/2 cup chopped cilantro

Preheat oven to 425 degrees F.  Toss the sweet potato chunks with the olive oil, cayenne, 1 teaspoon of the cumin, and 1 teaspoon of the salt.  Place on a baking pan.  Place the un-husked corn on another baking pan.  Put both in the pre-heated oven.  Roast the corn in the husk for 30 minutes or until corn is tender and remove from the oven.  Continue to roast the sweet potatoes for another 15 minutes (for a total of 45 minutes) or until easily pierced with a fork.  Allow the corn to cool enough to handle, remove husks, and cut kernels off of the cob.  Allow the veggies to cool completely.
Meanwhile, make your dressing.  Combine the tofu, vegan mayo (or just more tofu if you're not using vegan mayo), canola oil, apple cider vinegar, lemon juice, mustard, and chili powder in a blender and blend until smooth.
Once the potatoes and corn have cooled, place them in a large bowl with the onion and serrano chili.  Add the dressing and mix gently to combine.  Add the cilantro and mix again.  Taste for spices and adjust to your tastes as necessary.  Chill until you're ready to eat!


Tips and Tricks:

1. Vegenaise is really amazing.  I'm definitely not a proponent of vegan-specific, pre-packaged foods, as they tend to be rather unhealthy and VERY expensive, but I was a great lover of mayo on many things before I was vegan, and Veganaise thus has a special place in this ninja's heart.  It's amazing as a base for dressings or just smeared on the bun of a portobello burger.  The taste is pretty spot-on and I love it.  If you're subbing more tofu for the 1/4 cup vegan mayo, just taste the dressing before pouring it on, as you may need more vinegar, mustard, or lemon juice.  Remember - all good fur ninjas taste, taste, taste as they cook!

2. When you mix in the dressing and cilantro, be GENTLE.  The sweet potatoes will be very soft, so they will get mushy easily.  If some of them break up, that's ok, but you don't want a goop-y mashed potato consistency.  There should be some whole pieces of potato going on in there.

3. This recipe makes for a lightly-dressed potato salad, which I felt was great because it allowed the flavors of the veggies, spices, and cilantro to shine through, and the use of softer sweet potatoes rather than white potatoes added creaminess to the finished product so not a lot of dressing was needed.  However, if you're a huge fan of potato salad that's just DRIPPING with dressing, the dressing recipe can easily be doubled.


So that's it for now, ninjas....I hope those recipes will keep you busy for a while and give you lots of ninja-cooking inspiration.  I DID make one more thing for the birthday party - insanely decadent brownies that put everyone into a complete and total chocolate and sugar-coma.  I'll be posting those soon!

And now, I leave you with a pic of my big awesome ninja family with the lady who inspired me to come up with both of these recipes.  Thank you, ninja-grandmom a.k.a. Leatrice for being such an integral part of my life, and being the inspiration for me every day to be a more kind, generous, and loving soul.  I hope you loved your birthday party....can't wait for the 100th!

Whether related by blood, marriage, or love alone (us ninjas like to "adopt" random people!), my family is loud, obnoxious, opinionated, and absolutely the bestest family anyone could ever ask for.  Here's to good food, good family, and  ninja-love!

Love,
The Fur Ninja


Sunday, July 15, 2012

Roasted Butternut Squash Quesadillas

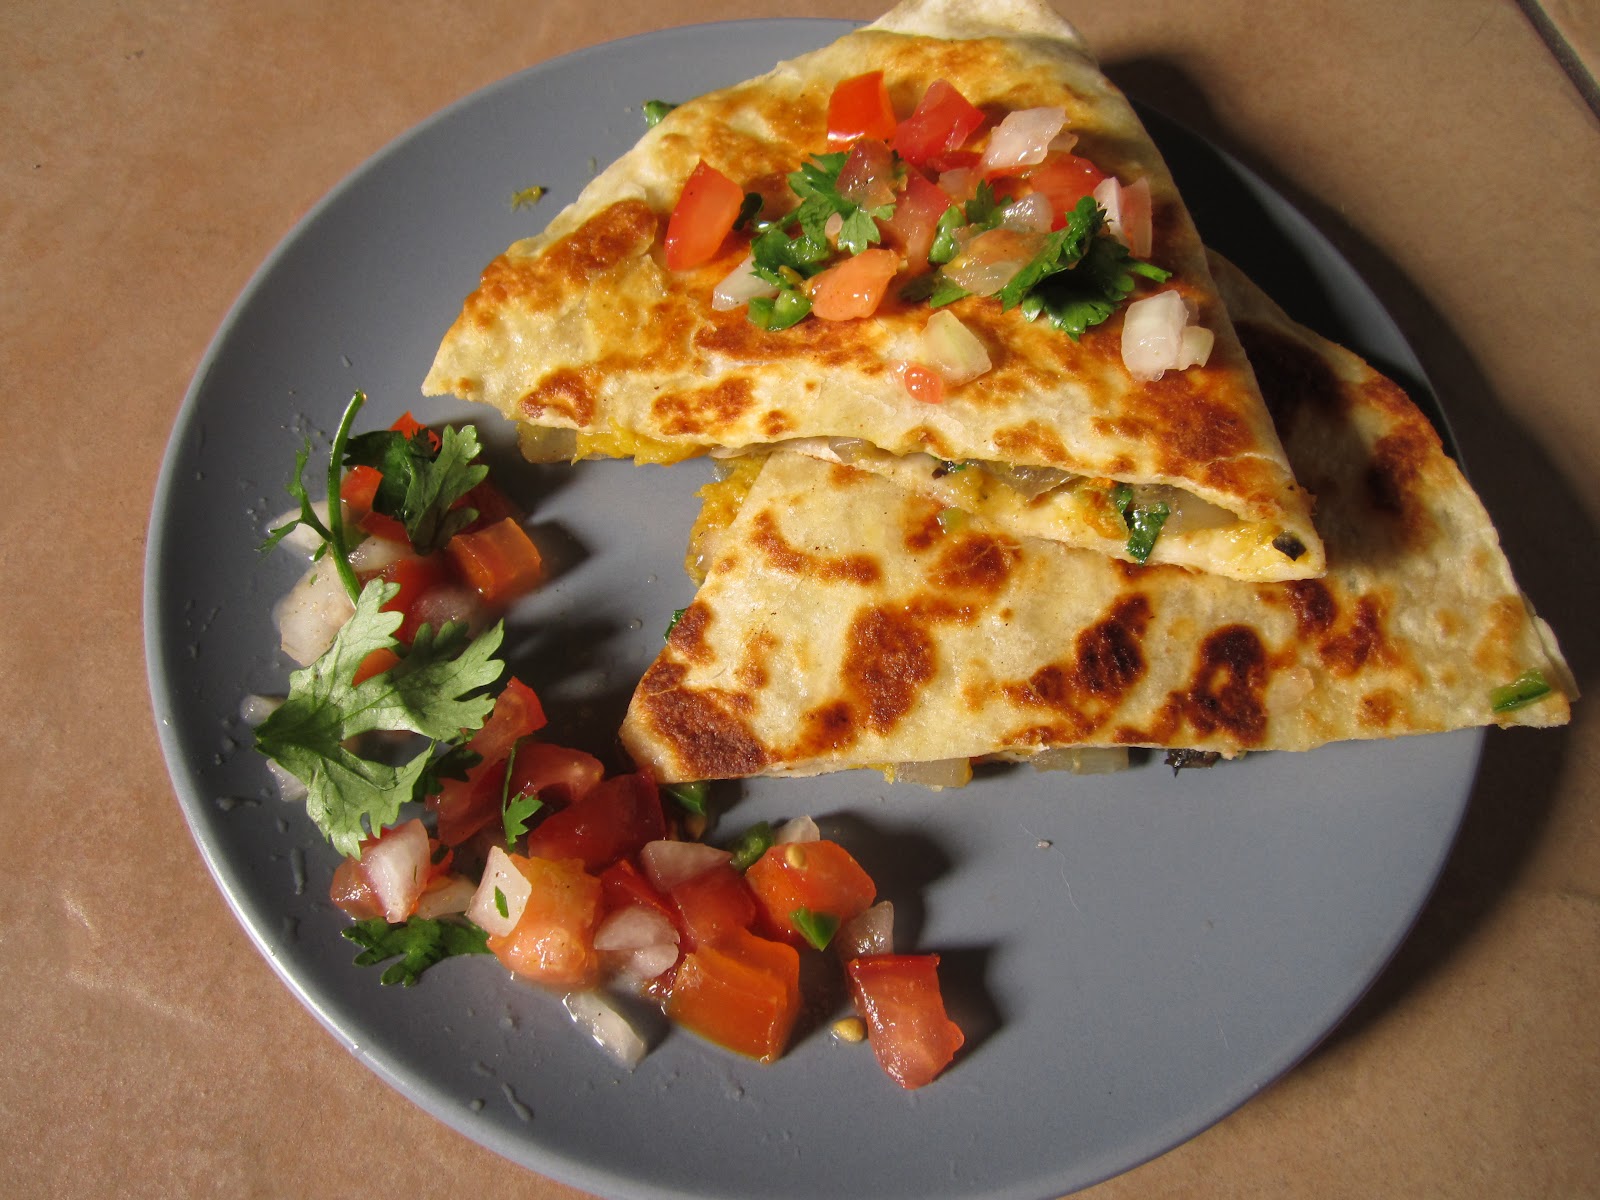
So it's been quite some time since I've had the pleasure of biting into the blissful deliciousness that is a quesadilla.  This ninja is not only a vegan, but also a huge proponent of eating food in as close to a natural state as possible.  Because of that, I really hate using vegan fake-cheese products (not to mention that they are very expensive).  That's not to say I don't indulge in the occasional box of macaroni and Chreese (Road's End Organics makes some deliciously easy comfort food), but on the regular, when I'm taking the time and effort to make a meal from scratch, I want to avoid pre-packaged foods if at all possible.  So because I never came up with anything that was a decent substitute for creamy, melty cheese to nestle between halves of toasty tortilla, I've just gone without.  But one day....it hit me.....squash!  Roasted butternut squash is creamy, slightly sweet, and gooey enough to hold a quesadilla together.  I decided to try it and these were a huge hit.  My ninja-love Mike was all about them, and his 15-year-old daughter liked them too.  His little ninjas (10 and 5) weren't so keen on them, but I'm unsure if it was due to lack of cheesiness or the fact that they were pretty spicy.  If you're going to feed these to little ninjas, I'd cut out the cayenne entirely and at least halve the other spices.

The squash blossoms in this recipe are entirely optional.  I honestly don't think they added much in the way of flavor.  Maybe I didn't use enough.  I have a squash plant in my garden though and decided to try it.  Pretty much the only way you're ever going to have access to fresh squash blossoms is if you grow squash yourself (because once you pick them you have to use them right away) so if you don't have them, no worries. With or without the blossoms, you'll love the creamy, slightly sweet and spicy filling between halves of crisp fried tortilla.  Just as good, if not better than the cheesy ones!


Roasted Butternut Squash Quesadillas


Ingredients:

1 medium-sized whole butternut squash (about 3 lbs)
2 portobello mushroom caps, cut into 1" chunks
1 large sweet onion, sliced into 1/2" thick half-moons
 4 Tablespoons olive oil + more for frying the quesadillas
1 1/4 teaspoons cumin (divided)
1/2 teaspoon oregano
10 large squash blossoms, washed and sliced thinly (optional)
2 cloves garlic, minced
1/2 cup nutritional yeast
1/2 teaspoon salt
freshly ground black pepper, to taste
pinch of cayenne pepper
Juice from 1/2 a lime (about 1 Tablespoon)
1/2 cup chopped cilantro
6 - 10" flour tortillas (burrito size)


Pre-heat oven to 400 degrees F.  Cut the stem off of the butternut squash and slice in half lengthwise.  Scoop out any seeds and stringy stuff and discard.  Using 1 Tablespoon of the oil, coat both halves along the cut (just the flesh, not the skin) liberally with oil.  Place cut-sides down on a baking sheet and bake for 30-45 min or until the squash is pierced easily with a fork.  Meanwhile, toss the mushrooms and onion with another 2 Tablespoons of the oil and place in another baking pan.  Add 1/2 teaspoon of the cumin and the 1/2 teaspoon oregano and toss again to distribute evenly.  Bake at 400 degrees for 20 minutes or until the mushrooms are tender and the onions are very soft and starting to brown.  Allow the vegetables to cool enough to handle.
While the vegetables are cooling, heat the remaining 1 Tablespoon olive oil in a skillet over low heat.  Add the minced garlic and squash blossoms (if using) and sautee gently until the garlic is golden and fragrant and the blossoms are wilted.  Remove from heat.
Once the squash is cool, scrape the flesh into a large bowl.  Mash the squash with the nutritional yeast, the remaining 3/4 teaspoon cumin, salt, pepper, cayenne, and lime juice.  Mix in the garlic and squash blossoms (or just the garlic if you don't have the blossoms).  Add in the chopped cilantro and mix again gently.
To assemble: place 1/2 cup of the squash mixture and 1/2 cup of the mushroom/onion mixture on one half of a tortilla, leaving about 1/2" space around the edge (because some of the filling will squish to the edge during cooking).  Fold the other half of the tortilla over the filling.  Heat about 1 teaspoon olive oil in a large skillet over medium heat.  Fry each quesadilla for about 2 minutes per side, or until golden brown.  Allow to cool slightly and slice each one into three triangles.  Enjoy with lots of fresh pico de gallo and guacamole!


Tips and tricks:

1. If you have extra filling, you can just make more quesadillas (duh) or the filling is delicious on it's own or rolled into a wrap or burrito.

2. Make sure you don't over-fill the tortillas.  The filling stopping 1/2" from the edge is very important unless you want it oozing out everywhere when you're frying.  Use your judgement.  Obviously, if you use smaller tortillas, use less filling.

3. The best way to flip the quesadillas is with two spatulas - slide one underneath and place the other on top to keep the quesadilla from opening while you flip.  Flip gently and your filling will stay where it needs to be!

4. Mike contests that "real" quesadillas need to be fried in butter, not oil.  I haven't tried this with non-dairy butter, but Earth Balance might give you good results so give it a try if you like!

5. Let the quesadillas cool slightly before cutting.  This will allow the filling to firm up a bit.  I let each one cool for about 2-3 minutes and had no problems with filling coming out.  Also, the best way to cut quesadillas into triangles is with kitchen shears rather than a knife....perfect triangles!


And because I love you so much, here's how you make pico de gallo in case any of my readers don't know.  It's not really a recipe since it's all pretty much to taste and uncomplicated:

3 diced tomatoes
1 diced onion
1/2 finely minced jalapeno
to taste:
salt
pepper
cumin
lime juice
chopped cilantro
Mix everything together and enjoy!  Remember - the fresher the veggies, the better it tastes!


That's all for today, ninjas!  Just had my grandmom-ninjas 90th birthday party this past Saturday and I made seitan hot "wings" with creamy dipping sauce, roasted sweet potato salad, and cashew-caramel brownies with toasted macadamias and coconut for dessert.  Everything was a HUGE hit at the party with both vegans and non-vegans alike, so those recipes up soon.  As always, feedback welcomed and thanks for reading!

Thursday, June 28, 2012

Pineapple-ginger Oatmeal Muffins and Betty White being awesome

Who doesn't love a good muffin?  I've had a can of crushed pineapple in my cabinet that my mom gave me - my beautiful mommy-ninja loads me up with absolutely ridiculous amounts of non-perishables every time I visit.  I think she is convinced that I am somehow going to starve to death.  At one point last year I had so many canned goods and dried beans and rice from her that it wouldn't all fit in my cabinets and I had bags of beans and cans all over my kitchen table and countertops.  Mom - as one of the few people who I know actually reads this blog - I love you...but you are slightly insane....and I think that just makes me love you more <3

But I digress....I wanted to stick the crushed pineapple in some kind of baked good, and I thought "hey, ginger sounds like it would be yummy with that" and then I started thinking about muffins.  This recipe was the result.  These are TRUE muffins - not the modern-day muffin that's actually just a cupcake with no icing.  They aren't too sweet and the ginger gives them just enough flavor to be satisfying.  The pineapple taste isn't very strong; it mostly lends a sweet backdrop and makes the muffins very moist without too much oil or sugar.  These make a great breakfast because they stick with you (I eat breakfast at 5:30 a.m. and then don't get to chow down on lunch until noon so trust me on this one) and according to my ninja-love Mike, pineapple revs up your metabolism.  Plus there's also oats in there for all sorts of fiber-y goodness.  Mike is awesome by the way.  Poor boy doesn't get much in the way of meat with me doing much of the cooking, but he still eats what I make with a smile on his face.  He loves my muffins anyway, hehe.

Anyway....onto the recipe:

Pineapple-ginger Oatmeal Muffins

(makes 12 standard-sized muffins)

I topped these muffins with a streusel made of ginger, oats, and brown sugar.  If you want to cut down on the sugar content, just make the muffins without it.  You can also increase the healthiness of these by using white whole wheat flour or a mix of all-purpose and whole wheat flour instead of just all-purpose.


Ingredients:

Streusel:
 1/3 cup oats
1/4 cup all-purpose flour
1/4 cup firmly packed brown sugar
1 teaspoon ginger
2 Tablespoons very cold non-dairy butter

Muffins:
1 1/2 cups all-purpose flour
1 cup oats
2 teaspoons ginger
1 Tablespoon baking powder
1/4 cup maple syrup
1 cup canned crushed pineapple with juice
1/4 cup canola oil
1/4 cup soy or almond milk
1 teaspoon vanilla

Pre-heat your oven to 400 degrees F.  Spray a muffin tin with cooking spray.
 First, make the streusel - mix the oats, flour, brown sugar, and ginger well in a small bowl.  Add the non-dairy butter and cut in with a pastry cutter or two knives until the mixture is well-combined and crumbly.  Set aside.
Next, make the muffin batter - mix the flour, oats, ginger, and baking powder in a large bowl.  Mix the remaining ingredients in a small bowl.  Pour wet ingredients into dry and mix just until combined.  Do not overmix!  The mixture should be very thick.
Fill the muffin cups almost to the top - about 3/4 full.  Top the batter with the streusel mixture, pressing the streusel gently into the top of the batter.  Now - this is important - let the batter rest in the muffin cups for 10 minutes.  Bake in the pre-heated oven for 18 minutes or until muffins are slightly golden on top and a toothpick inserted in the middle comes out clean.

Ninja Tips and tricks:


1. Don't use crushed pineapple in syrup; use the stuff that's in juice only.  The only ingredients on the can should be pineapple and pineapple juice.  Make sure you get some of the juice in there when you measure it out.


2. Make sure you spray your WHOLE muffin tin with cooking spray, not just the bottom of the cups.  These babies do rise over the edge (no flat-topped muffins for this ninja!) so if you don't spray the whole thing the tops might stick and we all know the top is the best part.


3. It's important to let the muffin batter rest before you slide them into the oven.  I used to be plagued by flat-topped, unattractive-looking muffins, and finally read that it was due to them not rising properly.  Letting them rest for 10 minutes gives the leavening agent (the baking powder) more time to work and makes lovely, dome-topped muffins.


4. Bake your muffin tray with a cookie sheet underneath it.  This will prevent the bottoms of the muffins from being overcooked.

Happy muffin making!  And now to close, as promised, here's a video of Betty White talking about her muffin:
(thanks to my ninja-love Mike for the video)