Thursday, April 11, 2013

How to Cook and Eat a Fresh Artichoke - Bonus Dipping Sauce Recipe!

Hey all!  I realize that I haven't been posting consistently as of late, but I've been a busy little bee here and haven't had the time.  I got a new job, and we are getting ready for springtime here at the Fur Ninja house - lots of spring cleaning and planting the gardens.  We planted cucumbers, okra, golden beets, peas, tomatoes, a rainbow of different colored bell peppers, a mix of leaf lettuces, and onions....also moonflowers and daisies, and we might put in strawberries and a blueberry bush as well.  So I've been busybusybusy and haven't had a moment to devote to posting new recipes for you.  But, I'm back and will have some lovely new springtime eats for all of you!

So to start with the welcome-to-spring recipes, here's a great one for fresh-cooked artichokes and a yummy dipping sauce to go with them.  Before meeting Mike, I had never had a fresh, whole artichoke before, and he taught me how easy they are to make and fun to eat!

First, we're going to talk about how to cook an artichoke.  It's easy.  First you need an artichoke (or two):

Cut off most of the length of the stem and pull off any dirty or malformed bottom leaves.  Rinse the artichokes and put them in a large pot.  Add water to cover.  Now place the pot, uncovered, over high heat and bring to a boil.  Lower the heat to a simmer, and simmer the artichokes for 30 minutes.  When the time is up, check for done-ness by pulling at the bottom leaves.  They should come off easily.  If not, simmer them for a few more minutes.
That's it!  Now you're ready to eat.  Here's how to eat an artichoke:

1. Pull off a leaf from the bottom.

2. Dip in sauce (optional).  Mike likes mayo, but some Vegenaise would probably also be amazing since we're vegans around here.  Also good is hummus, goddess dressing, and my own recipe for chili chickpea dip (recipe below).

3. Scrape off the sauce and soft outer layers of the leaf with your teeth, as Mike is demonstrating here.


4. Discard the rest of the leaf.


5. Repeat with a new leaf until all the leaves are gone.
With yummy goddess dressing and chili chickpea dip in the background


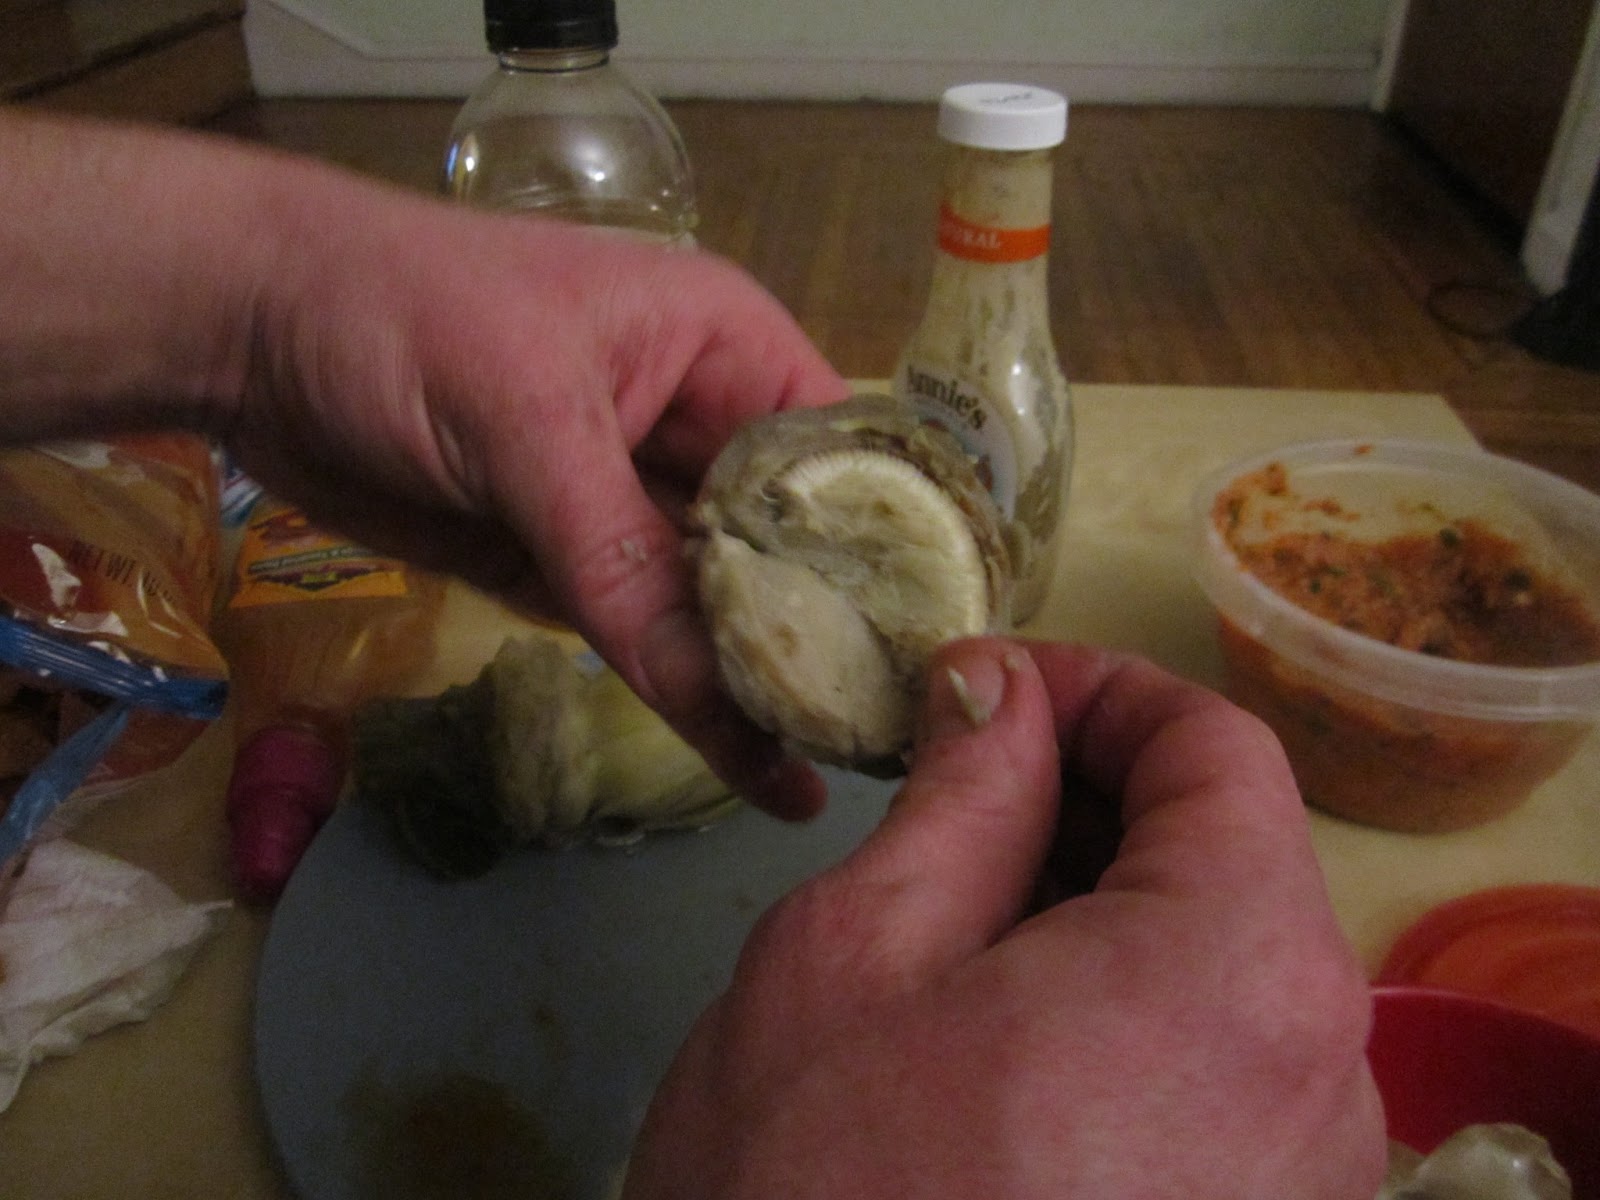
6. Once all the leaves are gone, you'll be left with the artichoke heart that is covered by this weird, fuzzy stuff called the "choke."  Don't eat the choke.  Remove it with your fingers to uncover the heart below.
The choke covering the yummy heart

Mike pulling off the fuzzy choke

Choke gone and the heart is ready to eat!


7. Cut or break the heart into bite-sized pieces, dip and eat!
Delish!

8.  Yum!  Have another!

Artichokes are so easy to make and such fun finger-food that I'm sad I only just discovered how awesome they are.  We'll be eating a lot of these outside this summer!

Now, as promised, here is the super-easy and tasty recipe for my Chili Chickpea Dip. This dip is great not just with artichokes, but also with other fresh veggies, tortilla chips, or pita bread.  You can add more or less hot sauce to adjust for how much spice you want.

Chili Chickpea Dip

Ingredients:
1-15 ounce can of chickpeas, drained and rinsed
1-14.5 ounce can diced tomatoes (preferably fire roasted)
1/2 an onion, chopped coarsely 
3 cloves garlic, chopped
1 1/2 teaspoons paprika
1 1/2 teaspoons cumin
1/2 teaspoon sugar
1/2 teaspoon oregano
1 teaspoon salt (or to taste)
1 Tablespoon lime juice
2 teaspoons hot sauce
1/2 cup lightly packed cilantro

Throw everything in a blender or food processor and pulse until everything is well combined.  You don't want to totally puree the mixture; it should be a little chunky but everything should be evenly mixed.  Chill until ready to serve.

That's all for now, but I'll be back soon with a recipe for kid-approved peanut butter and jelly muffins, and I'm working on a mac and cheese with kale and lemon raspberry scone recipes as well.  See you soon!

Love,

The Fur Ninja <3

Saturday, March 16, 2013

Braised Tempeh with Fennel and Spring Vegetables

Well, I know it's been a minute, but I'm back again with some new recipes just perfect for this time of year.  On days like today, when it is sleeting outside (well, it is here in Philadelphia anyway), it might be hard to believe that spring is right around the corner, but indeed it is.  My next few recipe posts will highlight fresh and seasonal spring vegetables that will be making their way into farmer's markets and supermarkets alike very, very soon.  Cooking with fresh, local veggies is always the best way to go, so add some of these recipes to your spring cooking arsenal.

Don't be intimidated when you scroll down and see the ingredients list.  Once you have the veggies chopped, this recipe comes together quite quickly and easily, and it makes enough to have leftovers for quite a while.  This recipe is a delicious combination of marinated and braised tempeh with crisp veggies like fennel, yellow bell pepper, and green beans.  Everything is sauteed gently and then braised in the herbed white wine marinade from the tempeh with plum tomatoes and even more fresh herbs.  Serve the whole thing over rice, couscous, or quinoa for a colorful and flavorful springtime feast.

Braised Tempeh with Fennel and Spring Vegetables
serves 6-8


Ingredients:

8 ounce package tempeh

(Marinade)
1/4 cup white wine
1/4 cup vegetable broth
2 cloves garlic, minced
2 Tablespoons olive oil
2 Tablespoons soy sauce 
1 Tablespoon packed brown sugar
1/2 teaspoon marjoram
1/4 teaspoon thyme, crumbled a bit in your fingers
 several grinds fresh black pepper 

2 Tablespoons olive oil
3 cloves garlic, minced
1 onion, sliced into thin half moons
1 fennel bulb, sliced 1/4" thick
1 yellow bell pepper, seeded and diced 
2 cups halved green beans
1 - 28 ounce can whole tomatoes with juice
1 Tablespoon cornstarch
2 sprigs fresh rosemary
2 sprigs fresh thyme
1 - 15 ounce can white beans, drained and rinsed
zest from 1 orange
2 teaspoons salt
several grinds fresh black pepper
2/3 cup chopped fresh parsley  


Cut the tempeh into cubes about 3/4 of an inch.  Mix together all of the marinade ingredients in a shallow dish.  Add the tempeh and marinate at least 30 minutes (but the longer the better), tossing halfway through marinating to ensure that all sides are covered in the marinade.
Heat the 2 Tablespoons olive oil in a large soup pot over medium-low heat.  Add the 3 cloves minced garlic and sliced onion.  Cook for 12 minutes until onion is carmelized.  Add the tempeh along with the marinade to the pot and raise the heat to medium.  Simmer for 5 minutes.  Add the fennel, bell pepper, and green beans and cook for another 3 minutes.
Remove the tomatoes from the can and slice widthwise into approximately 1/2" sections.  Add the tomatoes to the pot.  Add the cornstarch to whatever juice is left in the can from the tomatoes and whisk with a fork until most of the lumps have dissolved.  Add the juice to the pot with the sprigs of fresh rosemary and thyme.
Now, take a moment to look at how pretty this all is:


Make sure everything is mixed together and that the sprigs of fresh herbs are incorporated into the mixture.  Cover the pot and allow everything to simmer together for 20 minutes.
Now uncover the pot, remove the rosemary and thyme sprigs, and give everything a stir.  Add the drained and rinsed beans, orange zest, salt, pepper, and parsley.  Stir again and turn off the heat.  Allow everything to sit for 5 minutes to incorporate the flavors.  Serve and enjoy!

I hope you all decide to try this recipe as the weather turns warmer.  It is beyond delicious and perfect for dinner after a trip to the farmer's market.  Mike and I both loved it and I'll definitely be making this again!

Up soon, more springtime recipes, including how to cook and eat fresh, whole artichokes (if you've never had one you are in for a treat and they're easy to make and fun to eat!) with yummy sweet and spicy dipping sauce.  As always, feedback is appreciated, and see you all soon!

Love,

The Fur Ninja <3
        

Saturday, February 16, 2013

Easy Spiced Roasted Carrots

Happy Saturday, ninjas!  I know I haven't been blogging much as of late, but things have been very stressful in my life for some personal reasons.  Even my usual "heal what ills you with food" approach to all things negative hasn't been very successful lately.  But yet, this ninja soldiers on.   I came up with this recipe a few nights ago when I needed a yummy side dish to fill out a Middle Eastern meal of falafel (made from a box mix) in whole wheat pitas topped with fresh veggies and the "Dill Tahini Sauce" from Veganomicon (this cookbook is a must-have for any vegan.  If you do not yet own it, please purchase it HERE).  The carrots were a perfect, slightly-spicy accompaniment to simple yet delicious Middle Eastern fare.  This recipe makes two big servings, but if you're serving a crowd, feel free to double, triple...whatever.  No matter how much or how little you make, this recipe is so easy that it will turn out great every time.

Easy Spiced Roasted Carrots
Makes two big servings


Ingredients:
2 cups carrots, peeled and sliced 1/2" thick
1 small onion, sliced into thin half moons
1/2" square fresh ginger, peeled and minced
1 Tablespoon olive oil
2 teaspoons packed brown sugar
1/4 teaspoon coriander
pinch cayenne
1/2 teaspoon salt
juice of 1/2 a lemon (about 1 1/2 Tablespoons)
1/4 cup chopped fresh parsley   

Pre-heat your oven to 400 degrees F.
Place the carrots, onion, and ginger in an oven-safe baking dish.  Drizzle with the olive oil and mix well to coat.  Add the brown sugar, coriander, cayenne and salt.  Toss everything together until evenly coated with oil and spices. Roast in the pre-heated oven for 35 minutes, checking once after about 15 minutes to stir everything around to ensure even cooking.  The carrots should be soft, but not mushy.
Remove the dish from the oven.  Add lemon juice and parsley.  The lemon juice will sizzle a bit in the hot pan and the parsley will wilt slightly.  Serve warm or room temperature.

Tips and Tricks:

1. The easiest way to peel fresh ginger is to scrape at the skin with the side of a spoon while running it under cool water.

2. Cold leftovers make a delicious filling for a pita!


Well, that's it for the food stuff today, but I do have one more thing to mention that is not specifically vegan-related.  As an owner of a small internet business myself, I'm always up for supporting someone else who is trying to get their own product off the ground.  I was recently contacted by the makers of this weird piece of clothing called Hoorag and asked if I would write a review on my blog if they sent me one.  So send me one they did, and even though it really has nothing to do with veganism, I thought some other people out there who were outdoors-y folks or runners might be interested.  As a runner, and as someone who occasionally has a head full of bulky dreadlock extensions, I personally love it.  It keeps my face warm like a ninja mask when I'm running in the cold, and it's pretty awesome at keeping unruly dreads contained while I'm trying to complete a workout or clean my house or whathaveyou.  So if you're a hiker, runner, or just have some big ol' hair, go check them out.  They have lots of cool prints to choose from (mine has sunflowers) and they make warm ones for winter and even ones for doggies.  Here's some pics of me in mine before going out for a frigid run in the cold:

Ready to run without feeling like I'm being stabbed in the lungs by cold winter air.  Yay!

Well, after that little endorsement, I must bid you all adieu.  More recipes soon.  Much love....

Love,

The Fur Ninja <3