After reading a bunch of paella recipes on the web, I realized that many of them included Spanish chorizo as an ingredient. Apparently Spanish and Mexican chorizo are quite different (I already have a recipe for tempeh chorizo flavored with Mexican spices that is quite tasty), and I figured that the crumbly texture of tempeh probably wouldn't work well here, so I decided to try my hand at making a Spanish chorizo out of seitan. Again, not sure as to the authenticity of the taste, but damn did this stuff ever kick ass. The mellow spiciness of the paprika and cayenne pepper plays off the sweetness of the brown sugar and makes a freakin' fiesta of awesome nomz in your mouth. Feel free to use just the seitan chorizo recipe in sandwiches, pasta, for breakfast, or anywhere you think some yummy, spicy-sweet sausage would be delicious. Now....onto the recipes!
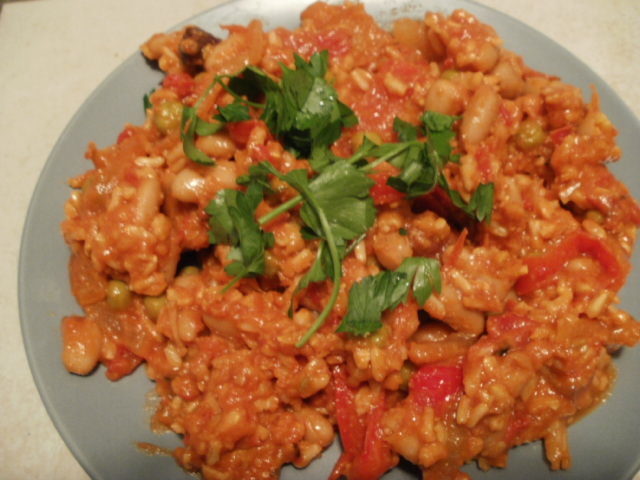
Paella with Seitan Spanish Chorizo
Ingredients:
2 1/4 cups vegetable broth
1 teaspoon saffron threads
1 Tablespoon vegetable oil
1 large onion, cut into thin half moons
2 red bell peppers, sliced into strips
6 cloves garlic
28 ounce can diced tomatoes (fire roasted if you can find them)
1/4 cup tomato paste
2 Tablespoons paprika
1 bay leaf
1 1/2 teaspoons salt
2 Tablespoons olive oil
1 recipe seitan Spanish chorizo (recipe follows), cut into bite-sized pieces
2 - 15 ounce cans of white beans, drained and rinsed
1 cup frozen peas
2 Tablespoons roasted red peppers, chopped finely
1 cup kalamata olives
1 1/4 cup rice
parsley for garnish
First, make your saffron broth. Bring your vegetable broth to a simmer in a small saucepan over medium heat. Add the saffron threads and simmer for 15 minutes. Remove the threads by skimming the top of the broth with a wire strainer or a slotted spoon. Set the broth aside.
Heat the vegetable oil in a large pot over medium heat. Add the onion, bell pepper, and garlic, and cook until the onion is translucent - about 10 minutes. Add the diced tomatoes, tomato paste, paprika, salt, and bay leaf and cook for another 10 minutes. Meanwhile, heat the olive oil in a large skillet over medium-high heat, and cook the seitan until browned, about 5 minutes. Add the seitan and beans to the tomato mixture along with the peas, minced roasted red peppers, olives, and rice. Cook for 2 minutes and then add the saffron-infused vegetable broth. Bring the mixture to a boil, stir, lower the heat to low, and cover the pot. Cook for 35-45 minutes or until all the moisture is absorbed.
Turn off the heat and allow the paella to rest for 10 minutes. Remove the bay leaf and fluff the rice with a fork and serve. Garnish individual servings with chopped parsley.
Tips and Tricks:
1. Holy @#$%, saffron is expensive! True. Saffron is the most expensive spice in existence. The container I bought ran me around $16.00 and I used all of it for this recipe. The saffron is pretty integral to this being "paella," although - let's be serious - this is far from "authentic" paella, so if you can't afford it, just leave it out and use regular old vegetable broth to cook your rice in. If you do this, obviously you can skip the first part of the recipe where you simmer the broth and just start with cooking the onion, pepper, and garlic.
2. I believe most "actual" paella requires one to make their own vegetable broth from scratch. However, anyone who is even a semi-regular reader of this blog knows that I am way too damn lazy to deal with stuff like making my own broth. If you'd like to make your own - go for it. Just add the saffron in the last 15 minutes of simmering all the other stuff you put in there.
3. There are actual specific types of rice for making paella. I couldn't find any "paella rice" so I just used brown rice and it was fine. Use brown or white if you can't find any rice specific to paella but I'd stay away from jasmine or sushi rice which might get too mushy.
4. Some of the paella recipes I looked at called for "piquillo peppers," which I have never heard of before. I was able to find them after a hard and frustrating search of the grocery store, and discovered upon opening the jar that appear to be really nothing more than roasted red bell peppers. If I'd known that I would have just bought some jarred roasted red peppers and saved myself the annoyance. So that's why I have "roasted red peppers" on the ingredients list instead of "piquillo peppers." If you're a purist though, or you just have easy access to them, feel free to use the real thing. And if you're someone who actually knows what the difference is, please feel free to enlighten me.
Seitan Spanish Chorizo
Ingredients:
1 1/4 cups vital wheat gluten
1 1/2 teaspoons salt
1/4 teaspoon nutmeg
2 teaspoons packed brown sugar
1 Tablespoon paprika
1 1/2 teaspoons cayenne pepper
1 teaspoon fennel seeds, crushed slightly
3/4 cup vegetable broth + enough to cover the seitan in the pot (about 6 cups)
1 Tablespoon apple cider vinegar
2 Tablespoons olive oil
2 cloves garlic
Mix the gluten, spices, and brown sugar in a large bowl. Mix the 3/4 cup vegetable broth, vinegar, olive oil, and garlic in a smaller bowl. Mix wet into dry and knead with your hands until a stiff, stretchy dough forms, about 5 minutes. If the dough is too wet, add more gluten, if it is too dry, add more vegetable broth. Your end result should be a very firm dough that stretches when pulled. Split the dough into 3-4 roughly equal pieces. Each piece should be a little smaller than your fist. Flatten the pices out a bit - this will help them to cook evenly. Place them in a pot with enough vegetable broth to cover them (you can use water too if you don't have enough broth) and bring to a boil. Once the pot is boiling, lower the heat to a low simmer and cover the pot. Simmer for 1 hour. Remove from the broth, allow to cool, and slice/cook as desired. If you want to store unused seitan, either refrigerate in the cooking broth or freeze it.
Tips and Tricks:
1. It might take a few tries to get the texture of seitan right. Too wet, and the pieces will fall apart when you try to simmer them in the broth, too dry, and your finished product will be hard and yucky in places, or the dough might not hold together at all. Keep trying and you'll figure it out. I've been making seitan for years and sometimes mine still doesn't turn out quite right for completely unknown reasons (actually when I made this recipe it turned out rather soft) but don't give up - seitan is so tasty and versatile, it is worth making the effort to master, and is a food that every vegan should know how to make.
2. This recipe makes relatively spicy seitan. If your palate is very sensitive to spicy foods, you may want to halve the amounts of cayenne and paprika.
3. Make sure you cook your seitan at a low simmer - turn the heat down on your stove as low as it will go. If you boil it too hard it will develop a spongy texture. If this happens, it is still ok to eat, it just won't have as much of a "meaty" feel.
Well ninjas, that's it for now! I realize that Thanksgiving is coming up, and I also realize I majorly failed at giving you any Thanksgiving recipes last year. However, this year I have been invited to possibly spend Thanksgiving with my mom, and Mamma-Ninja is super awesome when it comes to eating all of my culinary creations. Plus, her oven works, whereas mine has been broken for 6 months. My tentative Thanksgiving fare:
Garlic mashed potatoes with homemade gravy
Mushroom and roasted fennel stuffing with toasted walnuts
Vegan green bean casserole
Homemade cranberry sauce (with a "ninja" twist - this means alcohol in the recipe, folks)
Roasted brussels sprouts with dried cranberries
Cornbread
Pie - not sure what kind yet; I have tons of recipes I've been wanting to try out but haven't had an oven for so long....I may get slightly "pie-happy" if I get to use Mamma-Ninja's oven.
So hopefully all that works out and I'll have a ridiculously long Thanksgiving-feast post coming soon. If you can't wait that long, please check out last year's Thanksgiving recipe: Rum-spiked pumpkin pie with candied pecans and drink some extra rum for me! See you all again soon!
<3 The Fur Ninja


