Hello, ninjas! I just wanted to let you all know that I haven't forgotten about you. I have been cooking, but haven't had time to post any new recipes because life has been so crazy these past couple of weeks. I just found out that I need to move out of state on Monday. For reference, that's 3 days from now and I found this out yesterday morning! So needless to say, I'm going to be using any and all of my ninja skills for packing, not cooking and posting.
I'll be settled by the end of next week though, and I have lots of new yummy food to post, so get your tastebuds ready! In the meantime, have a happy, fur-ninja new year! This Star will be celebrating hers at a party in Brooklyn and then heading to Philadelphia on New Years Day to watch the Mummer's Parade. I'll probably grab some yummy vegan grub at Maoz and Gianna's while I'm down there too. Yummmmm.....happy new year from Star, Lucy, and Skye; see you all in 2011!
Thursday, December 30, 2010
Sunday, December 19, 2010
Ninja Applesauce - Easy, yummy, cheap...
Hello, ninjas!
I realize that it's been a while since I've posted a recipe; I've been trying out some new things, and some of them were....well, not failures, but definitely in need of some tweaking. I want you to have access to my best recipes, so I'm making all efforts for the ones I post to be 100% tweak-free. What kind of sensei would I be if I didn't give my ninjas-in-training the best tools and information to work with?
Speaking of which, if there's an actual Japanese word for "ninja in training," and you know it, please let me know. Your prize for imparting this information will be my everlasting gratitude...and maybe some cookies. Bonus if you can teach me to say "fur ninja in training." That might garner you some brownies as well.
But anyway, I've definitely been working the kinks out of some recipes during the last few weeks; I did come up with a killer recipe for crunchy coconut french toast that was to DIE for, but my sister-in-law is refusing to send me the pictures of it (I made it for her and my brother one weekend at their house), and those little toasted, coconut-y pieces of deliciousness were so cute, I can't bear to post the recipe without photos. If you know Michelle, please feel free to harass her to send me the pictures, as my own personal harassment seems not to be doing much good.
I don't want to leave my little ninja trainees without a new recipe for too long though, so here's the recipe I use when I want to make applesauce. It actually surprises me how few people make their own applesauce, as it's actually ridiculously easy and MUCH cheaper than buying the stuff in a jar. It tastes a lot better too. This recipe can be doubled or tripled to your heart's content - your only limit is the size of your cooking pot. It keeps for a while in the fridge, and it you're one of those super-amazing people that knows how to can your own food, it would probably work wonders with this recipe. Homemade applesauce is endlessly versatile - pack it in lunches, eat it by itself, have it on oatmeal, granola, ice cream, pancakes, mix with (vegan) yogurt, etc. Everyone with little ninjas running around should especially try this recipe; it's a great healthy snack (I don't think I've ever met a kid who didn't like applesauce), you'll save tons of money on those stupidly expensive applesauce snack cups from the grocery store, and making your own leaves more of the vitamins and minerals of the fruit intact because they're not being processed into oblivion. So what makes it "Ninja" Applesauce? Nothing really, beyond the fact that I needed a snappy title and "applesauce" just sounded less-than-thrilling. I'd like to think that if someone was a ninja of the vegan cooking arts though, that he/she would make her own applesauce. Whipping up some hot, homemade apple-y goodness is so much cooler than opening a jar of Motts.
Oh, and apologies, but I don't have a picture to go with this recipe. The batch I made got eaten so fast that by the time it occurred to me that I hadn't taken one, it was almost gone. I'm not terribly worried about it though - let's be serious, it's applesauce - I think we all know what it's supposed to look like. On to the recipe!
Ninja Applesauce
Ingredients:
2 1/2 lbs apples (about 7-8 apples)
1/4 cup orange juice (freshly squeezed is best)
1 Tablespoon non-dairy butter (optional, see below)
3 Tablespoons maple syrup
2 Tablespoons sugar
1/2 teaspoon vanilla extract
1 teaspoon cinnamon
1/4 teaspoon ground ginger
1/8 teaspoon allspice
pinch of nutmeg
1/8 teaspoon salt
Peeling your apples for this recipe is optional (I personally don't) but if you want to, do this first. Core your apples and chop them into 1/2" pieces. Heat a large saucepan over medium-low heat. Add the non-dairy butter (if using) and let it melt. Add the apples and stir them around to coat. Cook for 2-3 minutes until the apples are slightly softened. Add the rest of the ingredients to the pot, cover, and simmer for 30 minutes, stirring occasionally. The apples should break down slightly and release their juices, but won't be totally mushy. At this point, it's up to you what texture you'd like your applesauce to have. If you like it super-chunky, you're done. If you like semi-chunky applesauce (this is what I personally go for), take a potato masher to the pot and mush things around a bit. If you like your applesauce super-smooth (more along the lines of store-bought), you can puree it in the blender or food processor. I've never done it this way, but I'm not too sure how it would work if you left the skins on your apples in the first step. If you want super-smooth sauce, it's best to peel your apples.
Serve the sauce hot or cold. It keeps for at least a week in the fridge in a tightly-covered container. Enjoy!
Tips and tricks:
1. To peel or not to peel? I avoid peeling my fruits and veggies in any recipe where I can avoid it. This is mostly due to laziness, but also because the majority of nutrients are found in the peels. I almost never peel apples, even for things like pies or fruit crisps where I'm told you should (Julia Child is rolling over in her grave!) and everything always comes out great. I almost never peel things like potatoes, summer squash, cucumbers, and eggplant for the same reason. My general rule of thumb is that if the skin is edible, and leaving it won't compromise the taste/texture of the end result too much, I leave it. Of course, it will affect the outcome of the recipe somewhat, so it's up to you what you'd like to do. Leaving the skins on the apples in this particular recipe will leave you skin pieces mixed in with your sauce, and depending on what type of apples you use, can lend a rosy color to the sauce that I actually find quite pleasing. Of course, some people might not like the looks of skin-pieces floating about in there, or might not like to have to chew them (I'd recommend against leaving the skin if this sauce is being fed to very small children), so it's all up to you.
2. What kind of apples? Most commonly-found apples will work for applesauce (and for that matter, most recipes involving apples) with one exception: Red Delicious apples. Those apples are really only good for eating (and personally, I think the vile, mealy-textured things aren't even decent for that) and shouldn't be used in applesauce, pies, muffins, or any other recipes where you have to cook them. Choose an apple that is firm, crisp, and not overly-sweet. My favorite apples for pretty much anything from eating to cooking to baking are McIntosh.
3. Butter? Wtf is up with that? Adding the non-dairy butter is completely optional. I read once this is how you make "French" applesauce, tried it out, liked it, and kept doing it. Of course, the recipe for "French Applesauce" that I originally tried called for a LOT more butter than mine does. I think it adds a nice flavor and body to the sauce, so I scaled back the amounts (for health's sake - non-animal fats won't clog your arteries but will definitely make your pants too tight if you eat too much!) but kept is as part of my usual recipe. If you want to make your sauce fat-free though, just ditch the non-dairy butter and add all the ingredients to your saucepan in one step.
4. A note on maple syrup - I think I've mentioned this in a previous blog, but I cannot stress it enough: USE ONLY 100% PURE MAPLE SYRUP. The stuff you buy in the plastic squeez-y bottles that we all dumped in copious amounts on our pancakes as children is NOT maple syrup. Seriously, read the ingredients. It's basically artificially flavored high fructose corn syrup and water. It's disgusting, terribly unhealthy, and won't work for recipes. If you really must have the stuff, save it for your pancakes/waffles (although try real maple syrup on those too - delish!) and buy the real, honest-to-goodness maple syrup for cooking and baking. Yes, it's MUCH more expensive, but worth it. The grade and type (A, B, dark, light, etc.) doesn't really matter, and you don't need to buy some hoity-toity $20.00 an ounce organic stuff from Vermont that comes in a tiny bottle shaped like a maple leaf. I buy the store-brand. The big bottles usually run me about 8 bucks and they last quite a while, especially since when you use it as a pancake/waffle/french toast topping a little goes a long way because the flavor is very strong. If you've got the artificial sugar-water in your pantry, throw it out. Do it. Seriously. HFCS is the second-worst food item you can put in your body (partially hydrogenated oils being the worst) and you're missing out on some AMAZING flavored food if you're not using the real stuff. Ok, ok, I've berated you with this enough, but just remember: real ninjas don't use fake maple syrup.
That's it for now, everyone. Please let me know what you think of this recipe and the blog so far! Remember to bother Michelle for the french toast pictures and I'll post that one, I'm working on recipes for spicy southwest "sausage" lasagne, pasta with creamy sun-dried tomato sauce, and apple-butter pie with gingerbread scone crust. I also need to figure out what I'm making for Christmas dinner. If anyone has suggestions for a recipe they'd like to see me veganize, please get in touch!
<3, The Fur Ninja
Friday, November 26, 2010
Rum-Spiked Pumpkin Pie with Candied Pecans
Ok, ok, so I know Thanksgiving was yesterday and probably the last thing you want to think about is more pie...but hey, this one has rum in it. If you need a little hair o' the dog for your food and alcohol hangovers, why not kill two birds with one stone and make this?
A quick note on cooking with alcohol: there are some alcohol snobs out there who claim that you should never cook or bake with alcohol that you wouldn't enjoy drinking. Now this might not phase anyone swilling Bankers Club vodka or wine in a box, but to others who fork out a little more money for the good stuff (or at least moderately palatable stuff) it creates a question: do I buy good alcohol if all I'm going to do is dump it into something I'm eating? My answer is no. Whether your making rum pumpkin pie, vodka sauce, or deglazing a pan with white wine, pretty much any old alcohol will do without sacrificing taste too much. The only exception to this rule for me is using beer to make chili - I always use a good beer because the taste shines through the spices better - but pretty much anything else you can get away with cheap swill. Of course, then you're left with the dilemma of what to do with the rest of the bottle if you only use a little bit of the liquor for whatever you're making, so just use your judgment. I used Admiral Nelson spiced rum for this pie - the Admiral is Captain Morgan's lesser-respected but conversely higher-ranked shipmate. This is pretty cheap rum, but now I have nearly a full bottle left over after my baking was through. Not being one to be wasteful (there are sober people in 3rd world countries that would be happy to have that liquor), I do plan on drinking the rest of the bottle....probably this weekend....in its entirety. It does concern me somewhat that the last time I hung out with the Admiral, people's clothing came off....in public...but drink it I shall, consequences be damned. Sometimes you've just gotta make sacrifices for the sake of conservation and frugality.
But enough about my functional alcoholism....PIE!
Rum-Spiked Pumpkin Pie with Candied Pecans
*makes 2 pies

Note: if you're making both the pie and the whipped topping, you'll use an entire 16oz package of firm tofu, so once you measure out what you need for the pie, you don't have to measure what you need for the topping because it'll be whatever is left over)
Ingredients:
Pie:
2 Pie crusts (I'd post a recipe, but I'm still working out the kinks in mine so use a recipe you like; I recommend the cookbook The Joy of Vegan Baking for a good one, or use store-bought pie crust if you like)
1 15oz. can of pumpkin (not pumpkin pie mix; just plain ol' canned pumpkin)
1 cup firm tofu, pureed (the kind packed in water; 1 cup is about 2/3 of a package)
1 cup firmly packed brown sugar
2 tablespoons non-dairy butter, melted (I use Earth Balance)
1 1/2 cups soy creamer or plain soymilk
1 1/2 teaspoons cinnamon
1 teaspoon ground ginger
pinch of cloves
pinch of nutmeg (if you can get whole nutmeg and grate it yourself, it's great here)
pinch salt
2 tablespoons spiced rum
2 teaspoons vanilla extract
2 tablespoons arrowroot or cornstarch
Whipped Topping:
1/2 cup firm tofu, pureed
1 cup soy creamer or soymilk
1/4 cup + 2 teaspoons confectioners sugar
1 teaspoon arrowroot
2 teaspoons spiced rum
1 teaspoon vanilla extract
pinch of salt
Candied Pecans:
1/2 cup chopped pecans
1/4 cup packed brown sugar
2 tablespoons non-dairy butter
1/8 t salt
Pre-heat your oven to 375 degrees. If you're making your own pie crusts, pre-bake them for 10 minutes in the oven - cover them with foil and put dried beans in them to make them hold their shape, or use pie weights. If you're using store-bought crusts, follow the instructions on the package; dough crusts will need pre-baking; graham cracker crusts may not. Remove crusts from oven.
Make the pie filling first. In a large blender or food processor (a food processor works better), puree the 1 cup tofu and arrowroot/cornstarch. Measure your tofu by breaking chunks off of the block and kind of squooshing it into a measuring cup until it's mashed down in there. Try to be as precise as possible, but it doesn't have to be perfect. After the tofu mixture is pureed and smooth, add the brown sugar and non-dairy butter and puree again. Add the soy creamer/soymilk, spices, rum, vanilla extract, and canned pumpkin and puree until very smooth, stopping to scrape down the sides a few times to make sure everything is incorporated. Pour the mixture into the pie shells. Bake at 375 for 10 minutes, and then without opening your oven or disturbing the pies, turn the heat down to 300 degrees and bake for another 35-45 minutes until the outer edges of the pies are lightly browned and set. The middle of the pies may still be slightly goo-ey; they will set up more as the pies cool. Cool pies completely.
While your pies are baking, make the whipped topping. Using a small blender, puree all ingredients until very smooth and creamy. Chill for several hours in the refrigerator.
To make the candied pecans, melt the butter and brown sugar, and salt over medium heat. Add the pecans and cook for 5 minutes until the mixture gets clump-y and sticky. Remove pecans from heat and dump onto a plate lined with aluminum foil and sprayed lightly with cooking spray. Spread the pecans out a bit so they will cool faster. Cool completely. The nuts may cool and stick into a single mass; just break them apart once they are cool enough to handle. **These also make great candy for snacking on!
Once your pies are cooled, spoon dollops of the whipped topping onto your pie and sprinkle with chopped pecans. Serve immediately or chill until you're ready to eat. Eat while passing around the bottle of Admiral Nelson - classy!
That's it for now; hope everyone had a great Thanksgiving!
<3 The Fur Ninja
Tuesday, November 23, 2010
Quick and Easy Chickpeas and Veggies with Balsamic Sauce, and musings on Thanksgiving
Hey there, fellow veg-heads! Now I know most food blogs would be posting all sorts of decadent, time-consuming recipes right now because of the Thanksgiving holiday approaching, but...well....this isn't "most" food blogs.
I tend to have issues with Thanksgiving, and not just because of the usual reasons of celebrating the destruction of indigenous culture that most socially-conscious people have. Frankly, I find it rather disturbing that we choose to celebrate "being thankful" for what we have by making gluttonous pigs of ourselves while there are people in our own neighborhoods who don't have enough to eat on a daily basis. Then there's the purely pragmatic issues - the fact that I basically have to cook my own meal in its entirety every year, and then figure out how to package it, transport it, and re-heat it at whatever location the annual family Thanksgiving dinner is taking place. It's time consuming, complicated, and kind of stresses me out. So I was actually pretty pleased when my family kind of bailed on me in favor of doing things with various in-laws and step-children that don't really include me. Instead of stressing about how the hell I'm going to manage packing a main course, stuffing, side dishes, and dessert into my car for an hour drive, I'll be spending my Thanksgiving with an Amy's cheeseless frozen pizza and a pint of Turtle Mountain soy ice cream. I'll still be making dessert (rum-spiked pumpkin pie) for a later-in-the-day meetup with my brother and sister-in-law though, so be on the lookout for that recipe soon :)
So on to the food....here's a nice, quick and easy main dish that you can whip up without much time or effort at all. Feed yourself with this on a night when you're freaking out about not having enough dinner rolls for guests or thinking about how much you're dreading back-handed comments from your in-laws...holidays are stressful; it's the perfect time for some easy, tasty food.
Chickpeas and Vegetables with Balsamic Sauce

Super quick and easy and really versatile - try it with whatever fresh veggies you have on hand. Add "crunchy" veggies like onion, carrots, snap peas, etc. when you'd add the broccoli, and add "softer" veggies like summer squash or leafy greens when you add the tomatoes. Get creative!
3 Tablespoons olive oil
3 cloves garlic, minced
1/2 teaspoon dried thyme
8 ounces button mushrooms, sliced
1 cup chopped broccoli
1/4 cup white wine or vegetable broth
2 cups halved cherry tomatoes
1 15 oz. can chickpeas, drained and rinsed
1 teaspoon brown sugar
2 Tablespoons balsamic vinegar
1/4 teaspoon arrowroot or cornstarch
1/2 teaspoon salt
Freshly ground black pepper
Heat olive oil in a large skillet over medium-low heat. Add garlic and cook for 2 minutes until fragrant, being careful not to burn it. Crush the dried thyme in your fingers a bit and then add it to the skillet and cook 30 seconds. Add the mushrooms and increase the heat to medium. Cook the mushrooms for 4 minutes or until they begin to brown. Add the chopped broccoli and white wine/vegetable broth. Cook for 6-8 minutes - the broccoli should be bright green and tender, but not mushy. Add the cherry tomatoes and sprinkle everything with salt and freshly ground black pepper. Cook for another minute more. Add the chickpeas and cook for another minute.
Meanwhile, in a small bowl or measuring cup, mix the brown sugar, balsamic vinegar, and arrowroot/cornstarch with a fork until the lumps are dissolved. Pour over vegetables in skillet and stir everything around to coat all the veggies and beans in the sauce. Raise heat to medium-high and continue to stir everything around until the sauce begins to gently simmer. Simmer for 3-5 minutes, until the sauce thickens slightly. Taste for salt and pepper and serve.
Serve with a grain like brown rice, couscous or quinoa for a well-rounded meal.
Tips and Tricks:
1. If you're super pressed for time, or just really, really lazy, try using pre-sliced vegetables. You pay a bit more, but getting pre-sliced mushrooms and pre-chopped broccoli allows you to throw this together really fast because there's almost no prep time.
2. Three words: jarred minced garlic. Even if you're the type that relishes chopping your own veggies, get minced garlic in a jar to save you lots of time and stinky fingers. Make sure you get the kind in water (not oil); you can usually find it in the produce section. The flavor is just as good and it stays fresh in the refrigerator long after fresh garlic cloves would have gone moldy. When I use garlic in a recipe, 99% of the time it's from a jar. Substitute 1 teaspoon of the jarred stuff for 1 clove.
3. I'd recommend against using frozen broccoli for this because it'll come out mushy and the flavor won't be as good. This is a recipe where you really need to use fresh vegetables so that the flavor can shine with the balsamic.
Well, that's it for today then. Hopefully this meal will be at least one thing in your day that isn't stressing you out amidst all the holiday hubbub. And if you're disappointed that I don't have recipes for a huge feast posted, my apologies. I will have a pumpkin pie recipe posted next week, and I'll try to make it up to you at Christmas :)
And this Thursday, whether you're at a huge meal with lots of family, or happily noshing on frozen pizza and beer while snuggling with kitty cats, remember to be thankful for what you have....and more importantly who you have. Happy Thanksgiving with love from Lucy, Skye, and The Fur Ninja <3
I tend to have issues with Thanksgiving, and not just because of the usual reasons of celebrating the destruction of indigenous culture that most socially-conscious people have. Frankly, I find it rather disturbing that we choose to celebrate "being thankful" for what we have by making gluttonous pigs of ourselves while there are people in our own neighborhoods who don't have enough to eat on a daily basis. Then there's the purely pragmatic issues - the fact that I basically have to cook my own meal in its entirety every year, and then figure out how to package it, transport it, and re-heat it at whatever location the annual family Thanksgiving dinner is taking place. It's time consuming, complicated, and kind of stresses me out. So I was actually pretty pleased when my family kind of bailed on me in favor of doing things with various in-laws and step-children that don't really include me. Instead of stressing about how the hell I'm going to manage packing a main course, stuffing, side dishes, and dessert into my car for an hour drive, I'll be spending my Thanksgiving with an Amy's cheeseless frozen pizza and a pint of Turtle Mountain soy ice cream. I'll still be making dessert (rum-spiked pumpkin pie) for a later-in-the-day meetup with my brother and sister-in-law though, so be on the lookout for that recipe soon :)
So on to the food....here's a nice, quick and easy main dish that you can whip up without much time or effort at all. Feed yourself with this on a night when you're freaking out about not having enough dinner rolls for guests or thinking about how much you're dreading back-handed comments from your in-laws...holidays are stressful; it's the perfect time for some easy, tasty food.
Chickpeas and Vegetables with Balsamic Sauce

Super quick and easy and really versatile - try it with whatever fresh veggies you have on hand. Add "crunchy" veggies like onion, carrots, snap peas, etc. when you'd add the broccoli, and add "softer" veggies like summer squash or leafy greens when you add the tomatoes. Get creative!
Ingredients:
3 Tablespoons olive oil
3 cloves garlic, minced
1/2 teaspoon dried thyme
8 ounces button mushrooms, sliced
1 cup chopped broccoli
1/4 cup white wine or vegetable broth
2 cups halved cherry tomatoes
1 15 oz. can chickpeas, drained and rinsed
1 teaspoon brown sugar
2 Tablespoons balsamic vinegar
1/4 teaspoon arrowroot or cornstarch
1/2 teaspoon salt
Freshly ground black pepper
Heat olive oil in a large skillet over medium-low heat. Add garlic and cook for 2 minutes until fragrant, being careful not to burn it. Crush the dried thyme in your fingers a bit and then add it to the skillet and cook 30 seconds. Add the mushrooms and increase the heat to medium. Cook the mushrooms for 4 minutes or until they begin to brown. Add the chopped broccoli and white wine/vegetable broth. Cook for 6-8 minutes - the broccoli should be bright green and tender, but not mushy. Add the cherry tomatoes and sprinkle everything with salt and freshly ground black pepper. Cook for another minute more. Add the chickpeas and cook for another minute.
Meanwhile, in a small bowl or measuring cup, mix the brown sugar, balsamic vinegar, and arrowroot/cornstarch with a fork until the lumps are dissolved. Pour over vegetables in skillet and stir everything around to coat all the veggies and beans in the sauce. Raise heat to medium-high and continue to stir everything around until the sauce begins to gently simmer. Simmer for 3-5 minutes, until the sauce thickens slightly. Taste for salt and pepper and serve.
Serve with a grain like brown rice, couscous or quinoa for a well-rounded meal.
1. If you're super pressed for time, or just really, really lazy, try using pre-sliced vegetables. You pay a bit more, but getting pre-sliced mushrooms and pre-chopped broccoli allows you to throw this together really fast because there's almost no prep time.
2. Three words: jarred minced garlic. Even if you're the type that relishes chopping your own veggies, get minced garlic in a jar to save you lots of time and stinky fingers. Make sure you get the kind in water (not oil); you can usually find it in the produce section. The flavor is just as good and it stays fresh in the refrigerator long after fresh garlic cloves would have gone moldy. When I use garlic in a recipe, 99% of the time it's from a jar. Substitute 1 teaspoon of the jarred stuff for 1 clove.
3. I'd recommend against using frozen broccoli for this because it'll come out mushy and the flavor won't be as good. This is a recipe where you really need to use fresh vegetables so that the flavor can shine with the balsamic.
Well, that's it for today then. Hopefully this meal will be at least one thing in your day that isn't stressing you out amidst all the holiday hubbub. And if you're disappointed that I don't have recipes for a huge feast posted, my apologies. I will have a pumpkin pie recipe posted next week, and I'll try to make it up to you at Christmas :)
And this Thursday, whether you're at a huge meal with lots of family, or happily noshing on frozen pizza and beer while snuggling with kitty cats, remember to be thankful for what you have....and more importantly who you have. Happy Thanksgiving with love from Lucy, Skye, and The Fur Ninja <3
Wednesday, November 10, 2010
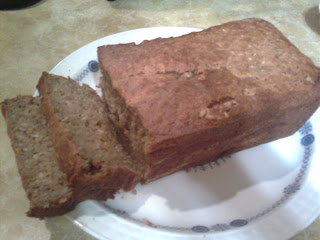
First recipe, yay! Tropical Banana Bread/Muffins.
So here's my first recipe. It's banana bread....but it's tropical. And we all know that anything to do with the tropics is automatically awesome. It's easy to make and super-delicious, and for anyone giving a crap about various expanding body-parts, the only fat it in it is from the coconut and the flax seeds....there's no oil in this whatsoever. Not like the health factor will be foremost on your mind as the super-moist, orange and pineapple-spiked banana bread with flecks of coconut melts in your mouth or anything....enough of me - onward!
Tropical Banana Bread/Muffins
Makes 1 loaf or 12 muffins

Ingredients:
1 teaspoon white vinegar or lemon juice
1/3 cup soy milk
1 3/4 cup all purpose or white whole wheat flour (or use half whole wheat and half all-purpose)
1/2 cup sugar
1 teaspoon baking soda
1/2 teaspoon salt
2 very ripe bananas, mashed well
3/4 cup pineapple canned chunks in juice (make sure it's the kind in 100% pineapple juice, not syrup)
3 Tablespoons ground flaxseed
1/2 cup + 1 Tablespoon orange juice
1/4 teaspoon pure vanilla extract
1/4 teaspoon orange extract (optional; if you don't have this, just use more vanilla)
1/2 cup shredded, unsweetened coconut
Preheat your oven to 325 degrees F. Lightly grease a standard-sized loaf pan with cooking spray or line a 12-cup muffin tin with paper liners.
Mix the vinegar/lemon juice and soy milk in a small cup or bowl and set aside. Mix flour, sugar, baking soda, and salt in a large bowl. Put the pineapple chunks, orange juice, and flax seeds in a blender or small food processor (the "bullet" type thingies work great for this) and whip until the pineapple is pureed and the whole mixture is slightly thickened and creamy from the flax seeds. In a medium-sized bowl, mix the mashed bananas, soymilk mixture, pineapple/OJ/flax mixture, and extracts until well-combined. Pour the wet ingredients into the dry ingredients and mix well until combined. Add the coconut and mix again.
Pour into the prepared loaf pan and bake for 1 hour 15 minutes, or until a toothpick in the center comes out clean. Allow to cool for 30 minutes before slicing.
If you are making muffins, fill the muffin cups almost to the top and bake for 25 minutes until a toothpick in the center of a muffin comes out clean. Remove the muffins from the pan to cool on a wire rack as soon as possible. Allow to cool for at least 15 minutes before eating so the muffins won't stick to the paper liners.
Tips and tricks:
1. Make sure your bananas are VERY ripe....like ripe to the point where you definitely wouldn't eat them on their own due to extreme mushy-ness. This is a great way to use up fruit that's kind of gross. I love it because I have a severe phobia of flawed produce (no lie) so putting smooshy bananas in bread allows me to eat them without being skeeved about it.
2. You can use 3/4 cup fresh pineapple chunks too, but seriously, who among us isn't too lazy for that? Makes sure your canned/jarred pineapple chunks are in 100% juice though (the label should list pineapple and pineapple juice as ingredients only); if you get the kind in syrup or with added sugar your bread will be overly sweet, not to mention that pineapple is plenty sweet on it's own, thanks.
3. Make sure you get UNSWEETENED coconut. The only ingredient should be (wait for it....) COCONUT. This can be challenging to find - you're probably not going to find it in the baking aisle of the grocery store with all the bagged coconut there. That stuff is almost always sweetened. I manage to find mine either in the natural foods aisle (most major grocery chains have one now) or in the produce aisle, wherever they keep the nuts and trail mix. Trust me; this stuff is worth the extra effort it takes to seek it out; the reason most commercial coconut is loaded with sweeteners and artificial flavors is because it's crappy-tasting coconut and that's how they cover up the fact that they're duping you into buying an inferior product.
4. I used a glass pan for this. If you use non-stick (I ABHOR the stuff and avoid using it at all costs, but if that's what you've got, more power to you) or a dark steel pan, you may have to adjust your cooking time. Darker pans tend to cook things faster, so if you're using one, start checking for done-ness at around 45 minutes and every 15 or so thereafter. It's done when a toothpick in the center comes out clean.
Hope you enjoyed; comments welcome and more recipes to come :)
<3, The Fur-Ninja
Tropical Banana Bread/Muffins
Makes 1 loaf or 12 muffins


Ingredients:
1 teaspoon white vinegar or lemon juice
1/3 cup soy milk
1 3/4 cup all purpose or white whole wheat flour (or use half whole wheat and half all-purpose)
1/2 cup sugar
1 teaspoon baking soda
1/2 teaspoon salt
2 very ripe bananas, mashed well
3/4 cup pineapple canned chunks in juice (make sure it's the kind in 100% pineapple juice, not syrup)
3 Tablespoons ground flaxseed
1/2 cup + 1 Tablespoon orange juice
1/4 teaspoon pure vanilla extract
1/4 teaspoon orange extract (optional; if you don't have this, just use more vanilla)
1/2 cup shredded, unsweetened coconut
Preheat your oven to 325 degrees F. Lightly grease a standard-sized loaf pan with cooking spray or line a 12-cup muffin tin with paper liners.
Mix the vinegar/lemon juice and soy milk in a small cup or bowl and set aside. Mix flour, sugar, baking soda, and salt in a large bowl. Put the pineapple chunks, orange juice, and flax seeds in a blender or small food processor (the "bullet" type thingies work great for this) and whip until the pineapple is pureed and the whole mixture is slightly thickened and creamy from the flax seeds. In a medium-sized bowl, mix the mashed bananas, soymilk mixture, pineapple/OJ/flax mixture, and extracts until well-combined. Pour the wet ingredients into the dry ingredients and mix well until combined. Add the coconut and mix again.
Pour into the prepared loaf pan and bake for 1 hour 15 minutes, or until a toothpick in the center comes out clean. Allow to cool for 30 minutes before slicing.
If you are making muffins, fill the muffin cups almost to the top and bake for 25 minutes until a toothpick in the center of a muffin comes out clean. Remove the muffins from the pan to cool on a wire rack as soon as possible. Allow to cool for at least 15 minutes before eating so the muffins won't stick to the paper liners.
Tips and tricks:
1. Make sure your bananas are VERY ripe....like ripe to the point where you definitely wouldn't eat them on their own due to extreme mushy-ness. This is a great way to use up fruit that's kind of gross. I love it because I have a severe phobia of flawed produce (no lie) so putting smooshy bananas in bread allows me to eat them without being skeeved about it.
2. You can use 3/4 cup fresh pineapple chunks too, but seriously, who among us isn't too lazy for that? Makes sure your canned/jarred pineapple chunks are in 100% juice though (the label should list pineapple and pineapple juice as ingredients only); if you get the kind in syrup or with added sugar your bread will be overly sweet, not to mention that pineapple is plenty sweet on it's own, thanks.
3. Make sure you get UNSWEETENED coconut. The only ingredient should be (wait for it....) COCONUT. This can be challenging to find - you're probably not going to find it in the baking aisle of the grocery store with all the bagged coconut there. That stuff is almost always sweetened. I manage to find mine either in the natural foods aisle (most major grocery chains have one now) or in the produce aisle, wherever they keep the nuts and trail mix. Trust me; this stuff is worth the extra effort it takes to seek it out; the reason most commercial coconut is loaded with sweeteners and artificial flavors is because it's crappy-tasting coconut and that's how they cover up the fact that they're duping you into buying an inferior product.
4. I used a glass pan for this. If you use non-stick (I ABHOR the stuff and avoid using it at all costs, but if that's what you've got, more power to you) or a dark steel pan, you may have to adjust your cooking time. Darker pans tend to cook things faster, so if you're using one, start checking for done-ness at around 45 minutes and every 15 or so thereafter. It's done when a toothpick in the center comes out clean.
Hope you enjoyed; comments welcome and more recipes to come :)
<3, The Fur-Ninja
Welcome to my blog!
Hi, my name is Star...ok, it's not my real name, but that's what you can call me. I'm here to share recipes and food talk with any and all like-minded individuals. So whether you're a veg*n, foodie, domestic goddess, fellow fur ninja, or whether you're just sick of not having any kickass drunk munchies for those Saturday nights swilling whiskey in your apartment....come in, try my food, bullshit with me; I guarantee a good time, or at least a full stomach and happy taste buds!
I've been vegetarian since 1996 and vegan since 2005, and started creating my own recipes a couple of years ago and decided I wanted to start sharing them, because while I have some cookbooks that I think are truly amazing (as evidenced by the many, many food stains on their well-loved pages), I'm really displeased with the quality of most recipes on the internet, especially when it comes to vegan food. I'll be posting lots of original recipes on here and would love feedback! If a recipe is so good it put you into a week-long food coma - tell me! If it was so vile even your dog wouldn't eat it - let me know! I'm especially interested in feedback from non-veggies and people who don't have tons of experience cooking, so even if you don't know what deglazing is or how to season a cast-iron pan, please don't be afraid to try stuff out, ask questions, and post comments :) I cook only with whole, non-pre-packaged foods (no trying to pass off Boca crumbles as a legit ingredient or any nonsense like that) and I try to include easy-to-find ingredients and substitutions whenever possible...hey, I live in the middle of nowhere, so if I can find it, chances are you can too.
I'll also be reviewing vegan cookbooks, various vegan/natural products, musing and/or ranting about life, and probably talking an inordinate amount about my kitties. I love my kitties. This is them, by the way:
Lucy:

and Skye:

I aspire to someday reach the pinnacle of spoiled laziness that both of them have attained.
So, hopefully even if you don't care about my thoughts or veganism or fur-ninja-ness, the cute kitties will get you to stay on a while. Welcome :)
Subscribe to:
Posts (Atom)